Fuse Reset and Replacement Procedure
Troubleshooting Guide (TG)
SAFETY CALLOUTS
Prior to completing work, please ensure the volunteer feels comfortable and safe to do so.
- Hybrid Van only - Ensure no one is in the shower before opening rear doors to inspect the back of the van or check the fuse box (if necessary). When standing on the rear door step, have another volunteer to spot and maintain three points of contact at all times.
- Fuse Resets - Dryer fuse resets may cause normal white smoke from the dryer exhaust lasting approx. 5 mins.
The location of the fuse may require reaching and twisting to small areas of the van, if this could aggravate an injury or condition do not perform the action and ask another volunteer to help.
KEY INFORMATION |
Fuse Box Locations
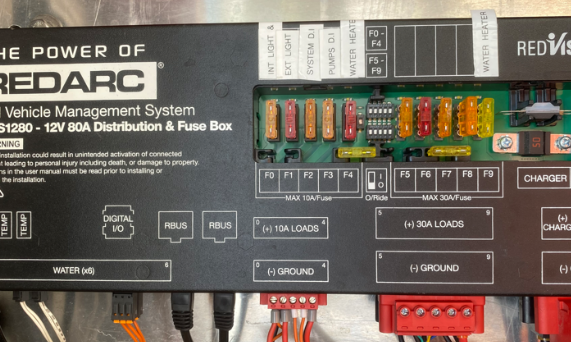
| Fuse boxes contain the electrical fuses. There are 3 different fuse boxes that are installed across the vehicles and pods.
The location of the fuse boxes change from vehicle to vehicle, and pod.
Refer to Fuse Box Locations here. |
INSTRUCTIONS |
Fuse Reset |
May require: - Person with confidence in confined spaces with twisting body motion
- A tall person comfortable with reaching up high
|
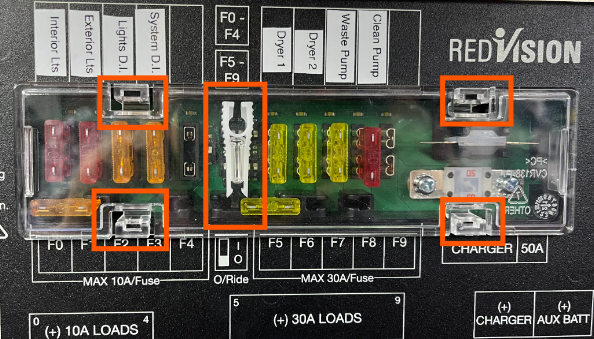
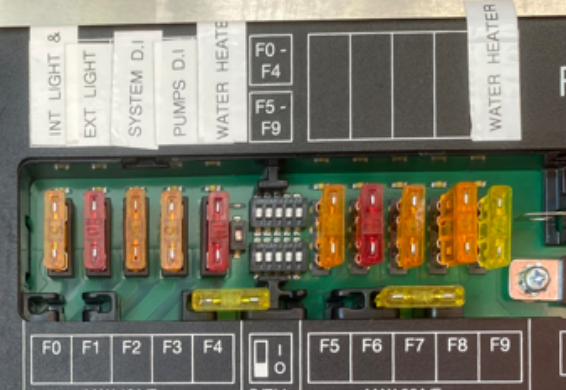
1. Ask the volunteer if they know where in the asset to find the relevant fuse (dryer 1, dryer 2, waste pump, shower waste pump, shower clean pump, hot water control & water heater power)
| Locate the fuse box to share with the volunteer.
Refer to Fuse Box Locations here. |
2. If the fuse you are looking for is in the fuse box pictured here >
There may be a clear plastic piece covering the fuses, remove this by squeezing the 4 clips on the side of the cover. There may also be a white plastic fuse gripper attached to the cover to use when removing a fuse (volunteers can use their thumb and pointer finger if this is missing!).
If you are needing to resolve ‘no hot water’ in the shower, refer to step 6 below.
| 
|
3. Using the labels on top of each fuse, find the one you are needing to reset. If there is a small white light above the existing fuse, this is likely blown and you will need to follow the Fuse Replacement Procedure below.
In one confident motion, extract the fuse directly outward from the fuse box. If the fuse is hard to extract, gently wiggle the fuse out.
NOTE: When the fuse is extracted, there may be a small spark and/or clicking noise. This is perfectly normal and safe. | 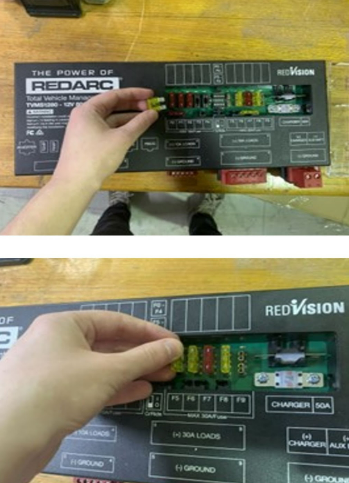
|
4. Wait 30 seconds. |
|
5. Insert the same fuse still in the gripper/fingers back into the same fuse slot from which you extracted. |
|
6. SHOWER WATER HEATER FUSE RESET
- Extract Hot Water Control fuse in the F4 position (red)
- Extract Water Heater Power fuse in the F9 position (yellow)
Wait 10 seconds
- Refit Water Heater Power fuse (yellow) back into F9 position
- Refit Hot Water Control fuse (red) back into F4 position
| 
|
7. Put the cover of the fuse box back on and return to the display. |
|
If the part resumes working, still submit an incident report in MyOS to ensure a record is captured.
If the issue persists, discontinue use of the component linked to the fuse and submit an incident report in MyOS. |
INSTRUCTIONS |
Fuse Replacement |
May require: - Person with confidence in confined spaces with twisting body motion
- A tall person comfortable with reaching up high
|
1. Ask the volunteer if they know where in the asset to find the relevant fuse (dryer 1, dryer 2, waste pump, shower waste pump, shower clean pump, hot water control & water heater power)
| Locate the fuse box to share with the volunteer.
Refer to Fuse Box Locations here. |
2. If the fuse you are looking for is in the fuse box pictured here >
There may be a clear plastic piece covering the fuses, remove this by squeezing the 4 clips on the side of the cover. There may also be a white plastic fuse gripper attached to the cover to use when removing a fuse (volunteers can use their thumb and pointer finger if this is missing!). |
|
3. Using the labels on top of each fuse, find the one you are needing to replace. If there is a small white light above the existing fuse, this is likely blown and will need a replacement.
In one confident motion, extract the fuse directly outward from the fuse box. If the fuse is hard to extract, gently wiggle the fuse out.
NOTE: When the fuse is extracted, there may be a small spark and/or clicking noise. This is perfectly normal and safe. |
|
4. Wait 30 seconds.
|
|
5. Find a brand new fuse that matches the colour, usually found in the spare fuse container inside the cab of the van. Insert the new fuse into the same fuse slot from which you extracted.
| Ensure the new fuse is the same colour as the blown fuse.
|
6. Put the cover of the fuse box back on and return to see if the replacement has resolved the issue.
|
|
If the issue persists, check if the replaced fuse has already blown again. If so, discontinue use of the component linked to the fuse and submit an incident report in MyOS.
- Continue shift at reduced capacity
- If shift has been running for more than 1 hr, and there are no friends present, pack up and head home
- Submit an incident report in MyOS
|